A SOAP Performance Script for WFA — Ankle Dislocation Primary / Wrist, Hand, Shoulder & Elbow / Flail Chest Discovery Last / Aquatic Environment “Everything Hurts — But Not Everything Equally”
Wilderness First Aid training uses acted scenarios because reading about injuries and actually responding to them are two entirely different cognitive experiences. The pressure of a real patient, even a simulated one, brings to the surface gaps in knowledge that a written exam never will. When a student kneels beside someone who is moaning, guarding a deformed ankle, and bleeding from a shell-embedded hand, their brain begins building the same neural pathways it will rely on when the patient is real, the terrain is difficult, and nobody is watching to tell them what to do next. Scenario-based training is more than a performance exercise, it is a controlled rehearsal for the moment when composure, systematic thinking, and clinical judgment must work together under stress, often far from help, with whatever is in the pack.
🎭 PRODUCTION NOTES FOR INSTRUCTOR
What you need:
- Type III PFD — worn, clipped
- Old shirt underneath — students will cut it open
- Trauma shears in the first aid kit. (I carry trauma shears “Sea Snips” on my PFD)
- Moulage kit:
- Left ankle/foot — dramatic purple and green bruising, foot held at abnormal lateral angle (primary distractor)
- Right hand/palm — red moulage, small dark dots or bits of dark tape simulating embedded shell fragments, visible bleeding (second distractor)
- Right wrist — swelling simulated with a thin foam pad wrapped loosely under a wristband, bruising moulage
- Right elbow — bruising moulage on lateral epicondyle area
- Right shoulder — subtle bruising only, hidden under PFD strap (not visible until PFD removed)
- Right lower ribs 5–8 — subtle bruising ONLY — hidden completely under PFD and shirt (last discovery)
- Small piece of dark gravel or shell fragment taped lightly to right palm moulage — visible and dramatic
Your acting strategy — three layers of distraction:
Layer 1 — The ankle. Loud, dramatic, visually deformed. Students go here first. You help them stay here.
Layer 2 — The right hand and wrist. Bloody, shell-embedded, visually alarming. When students finally pull away from the ankle, the bleeding hand pulls them sideways.
Layer 3 — The shoulder and elbow. Found only if students do a systematic head-to-toe. Subtle. Easy to miss.
The flail chest is Layer 4. It is never mentioned. It is never volunteered. It is found only through deteriorating vital signs and a chest exam performed after shirt removal. It is the lesson.
Acting cues are in (italics in parentheses)
Student cues are in [bold brackets]
🌊 SCENE SETUP
(Read aloud to the class before dropping into character)
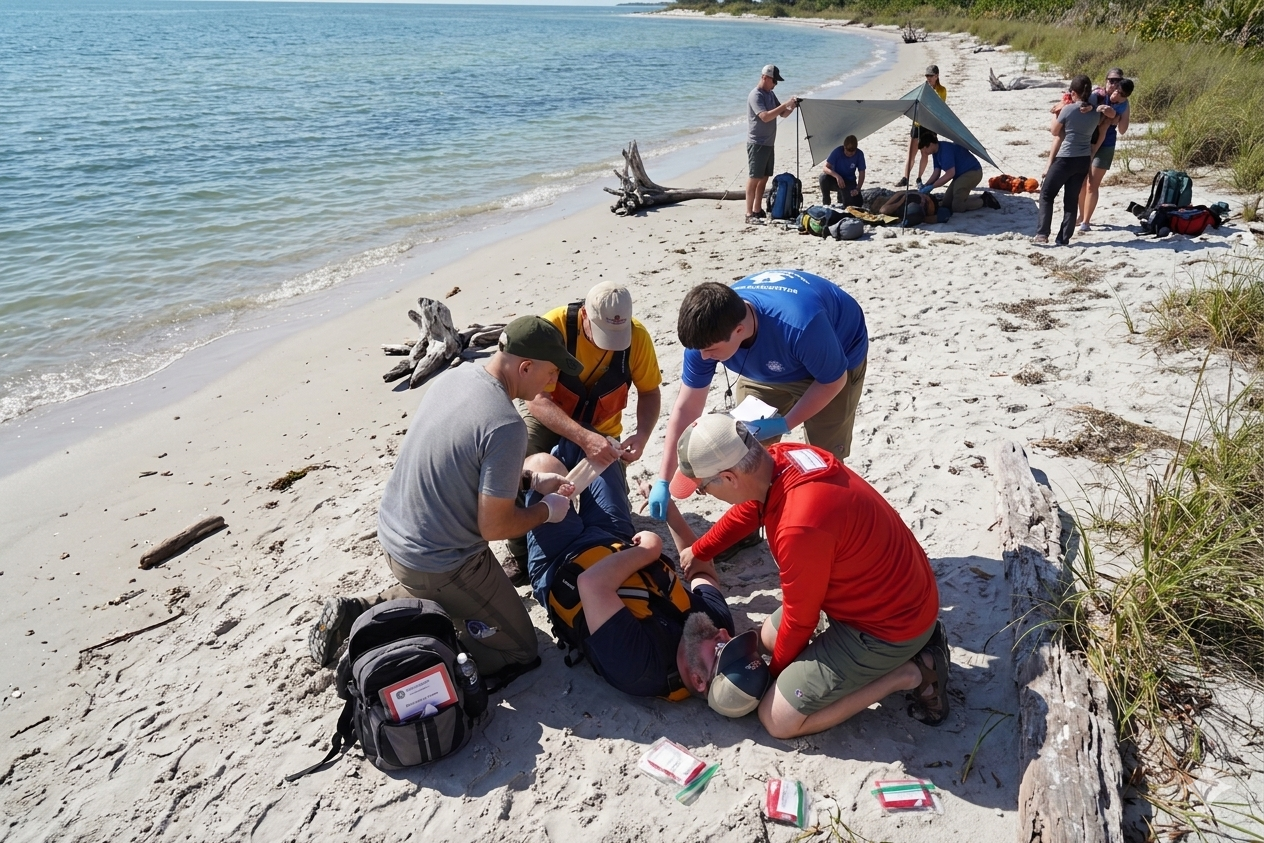
“Picture this. Private kayak camping trip, Gulf Coast barrier islands, Day 2 afternoon. Six paddlers landing through moderate shore break — two-foot surf, packed sand with exposed shell and limestone shelf underneath.
One paddler — me — surfs my loaded kayak in. I step out in knee-deep water. My left foot drops into a trough in the limestone shelf. I go down hard. Left foot plants and stays. My body keeps going right.
As I fall I throw my right hand out to catch myself — classic outstretched hand response — and land hard on the shell bottom. The right side of my chest hits the cockpit coaming on the way down. Nobody saw that part clearly. What everyone saw was the ankle and the blood on my hand.
Your job is to find me, assess me, and manage me.”
(Walk away. Lie on your side. Left leg extended with foot turned outward at an unnatural angle. Right hand and wrist visible and bloody — held slightly away from your body. Right arm drawn slightly in. PFD clipped. Eyes open, alert, focused entirely on your left foot. Wait.)
📋 ACT 1 — DISCOVERY
Your energy: pain, alarm, total focus on the ankle and the hand
[Student approaches, calls out]
(Look up immediately. Eyes wide. Point to your left foot with your right hand — then wince sharply as the movement pulls your right wrist. Pull the right hand back instinctively.)
YOU: “My ankle — look at my ankle. And my hand — I put my hand down when I fell and — look at it.”
(Hold up the right hand briefly so they can see the blood and the shell fragments. Then pull it back against your body because it hurts.)
YOU: “The ankle is the worst. Something really wrong happened to it.”
(Your eyes go back to the ankle. The hand was shown, noted, and now you are back to the ankle. Classic patient behavior.)
[Student establishes scene safety, calls for group]
[Student asks what happened]
YOU: (still staring at ankle, gesturing) “My foot caught the shelf — the limestone ledge under the water. My whole body went over. I put my hand down to catch myself and landed on the shells. And the boat — the boat was right there.”
(Wave your left hand vaguely toward the kayak — then immediately return attention to the ankle)
YOU: “The ankle went completely sideways. I heard it. Can you see the angle on it? It doesn’t look right.”
(Point insistently at the left foot. Keep their eyes there.)
📋 ACT 2 — SUBJECTIVE HISTORY
Your energy: cooperative, talkative, redirecting everything back to the ankle and hand
[Student asks about pain]
YOU: “The ankle is a nine. The hand is a seven — it’s burning where the shells are. My wrist hurts too — I landed on it.”
(Look at the right hand, then back to the ankle)
YOU: “Is the ankle supposed to look like that? Because it feels completely unstable.”
[Student asks if anything else hurts]
(Pause. Think. Then answer honestly but incompletely — you are not hiding anything, you are just overwhelmed by the more dramatic injuries)
YOU: “My wrist. My hand is the worst of the arm stuff — those shell pieces are in there. And my elbow hit something on the way down I think.”
(Touch your right elbow briefly — wince — then return to looking at the ankle)
YOU: “The ankle is what I’m really worried about.”
[Student asks about neck and back]
YOU: “No — my neck is fine. I went down sideways, not on my head.”
[Student asks medical history]
YOU: “Nothing. No conditions, no medications, no allergies. Lunch two hours ago. Been hydrating all day.”
📋 ACT 3 — THE RIGHT HAND AND WRIST
What students will find when they examine the right upper extremity
[Student examines right hand]
(Allow them to look. The hand is bloody with visible shell fragments embedded in the palm and base of the fingers. React to touch.)
YOU: (sharp intake of breath) “Right there — careful. Those shells are in there. I can feel them.”
(When student attempts to irrigate or remove fragments)
YOU: “Do what you need to do. Just — gently.”
(Grip strength test — right hand)
YOU: “I can grip but it’s weak. The wrist hurts when I squeeze.”
(Sensation right hand)
YOU: “My fingers feel normal. Tingly a little on the thumb side.”
[Student examines right wrist]
(When they palpate the distal radius — the most common fracture site in FOOSH — fall on outstretched hand)
YOU: (sharp wince) “That spot right there. That’s bad.”
(When they palpate the scaphoid — anatomical snuffbox)
YOU: “Ow — yes. What is that spot called?”
(This is a teaching moment — anatomical snuffbox tenderness is a classic scaphoid fracture indicator. Let the rescuer find it.)
(Range of motion right wrist)
YOU: “I can move it but it really hurts to flex it.”
[Student examines right elbow]
(When they palpate the lateral epicondyle and radial head)
YOU: “Tender there — yeah. Not as bad as the wrist but it took a hit.”
(Range of motion right elbow)
YOU: “I can bend it mostly. Here — about here.”
(Demonstrate approximately 110 degrees of flexion — stopping with a wince)
*[Student examines right shoulder — only if they systematically work up the arm]
(PFD strap is over the right shoulder — the bruising is hidden underneath it)
[If student removes or moves PFD strap to examine shoulder:]
(When they palpate the right anterior shoulder under the strap)
YOU: “Oh — I didn’t even notice that. That’s tender. I didn’t know it hurt there.”
(This is authentic — the shoulder pain was masked by the more dramatic ankle and hand injuries. You genuinely didn’t know.)
(When they assess range of motion right shoulder)
YOU: “I can lift it — about here.”
(Lift right arm to approximately 90 degrees abduction — stop with a wince)
YOU: “It aches. Not as bad as the ankle.”
📋 ACT 4 — THE ANKLE RETURNS
Students will cycle back here. Let them. Stay here as long as possible.
[Student performs Ottawa assessment on left ankle]
(Lateral malleolus palpation — sharp wince) YOU: “Right there. Don’t touch it hard.”
(Medial malleolus) YOU: “That too — yes.”
(Base of 5th metatarsal) YOU: (sharp) “Oh that’s bad. What is that?”
(Weight bearing attempt) YOU: (try to stand, immediately drop back down) “No. There’s nothing there. It just goes.”
(Distal PMS left foot — dorsalis pedis) YOU: “Can you feel a pulse there? My foot feels different. Not completely numb but — different.”
(Motor — toe wiggle) YOU: “I can try—” (wince) “It hurts but I can do it.”
(Sensation) YOU: “The top of my foot is tingly. Not normal.”
📋 ACT 5 — THE CHEST BEGINS
Timing: approximately 8–10 minutes into the scenario This is subtle. Students are deep in the ankle and hand. The chest sneaks up on everyone.
(During ankle splinting or hand irrigation — begin making small changes. Not dramatic. Subtle. Slightly faster breathing. Slightly shallower. The students are close and focused on the extremities. They may not notice.)
[If a student notices your breathing first]
YOU: (surprised they caught it) “Oh — yeah. I guess I’m a little… it’s probably just the pain. Everything hurts.”
(Take a deliberate breath. Flinch. Right hand goes briefly to your right lower ribs without really thinking. You notice your own hand there.)
YOU: “Huh. That’s weird. My side catches a little when I breathe deep. Probably from the fall.”
(Return to ankle conversation immediately.)
[If no student notices — introduce it yourself at T+8]
(Mid-conversation about the hand or ankle — stop. Look slightly confused. Put your right hand on your lower right ribs without really thinking about it. Stare at your hand for a moment.)
YOU: “Sorry — give me a second.”
(Take a careful shallow breath)
YOU: “My breathing feels… off. Started just now. When I breathe all the way in, something — catches. On the right side.”
(Look at your right hand on your ribs as if noticing it for the first time)
YOU: “I hit the cockpit on my way down. Right here.”
(Tap your right lower ribs lightly — flinch)
YOU: “I thought it was just a bruise.”
📋 ACT 6 — VITAL SIGN DETERIORATION
The numbers tell the story the patient cannot
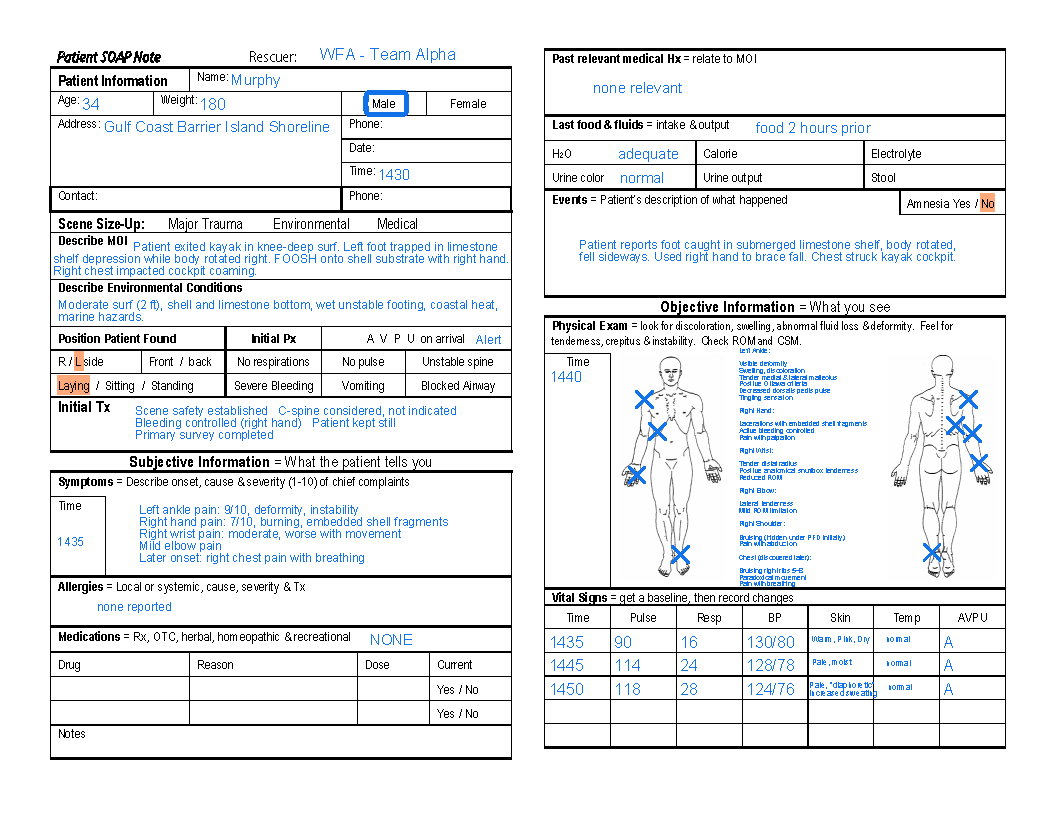
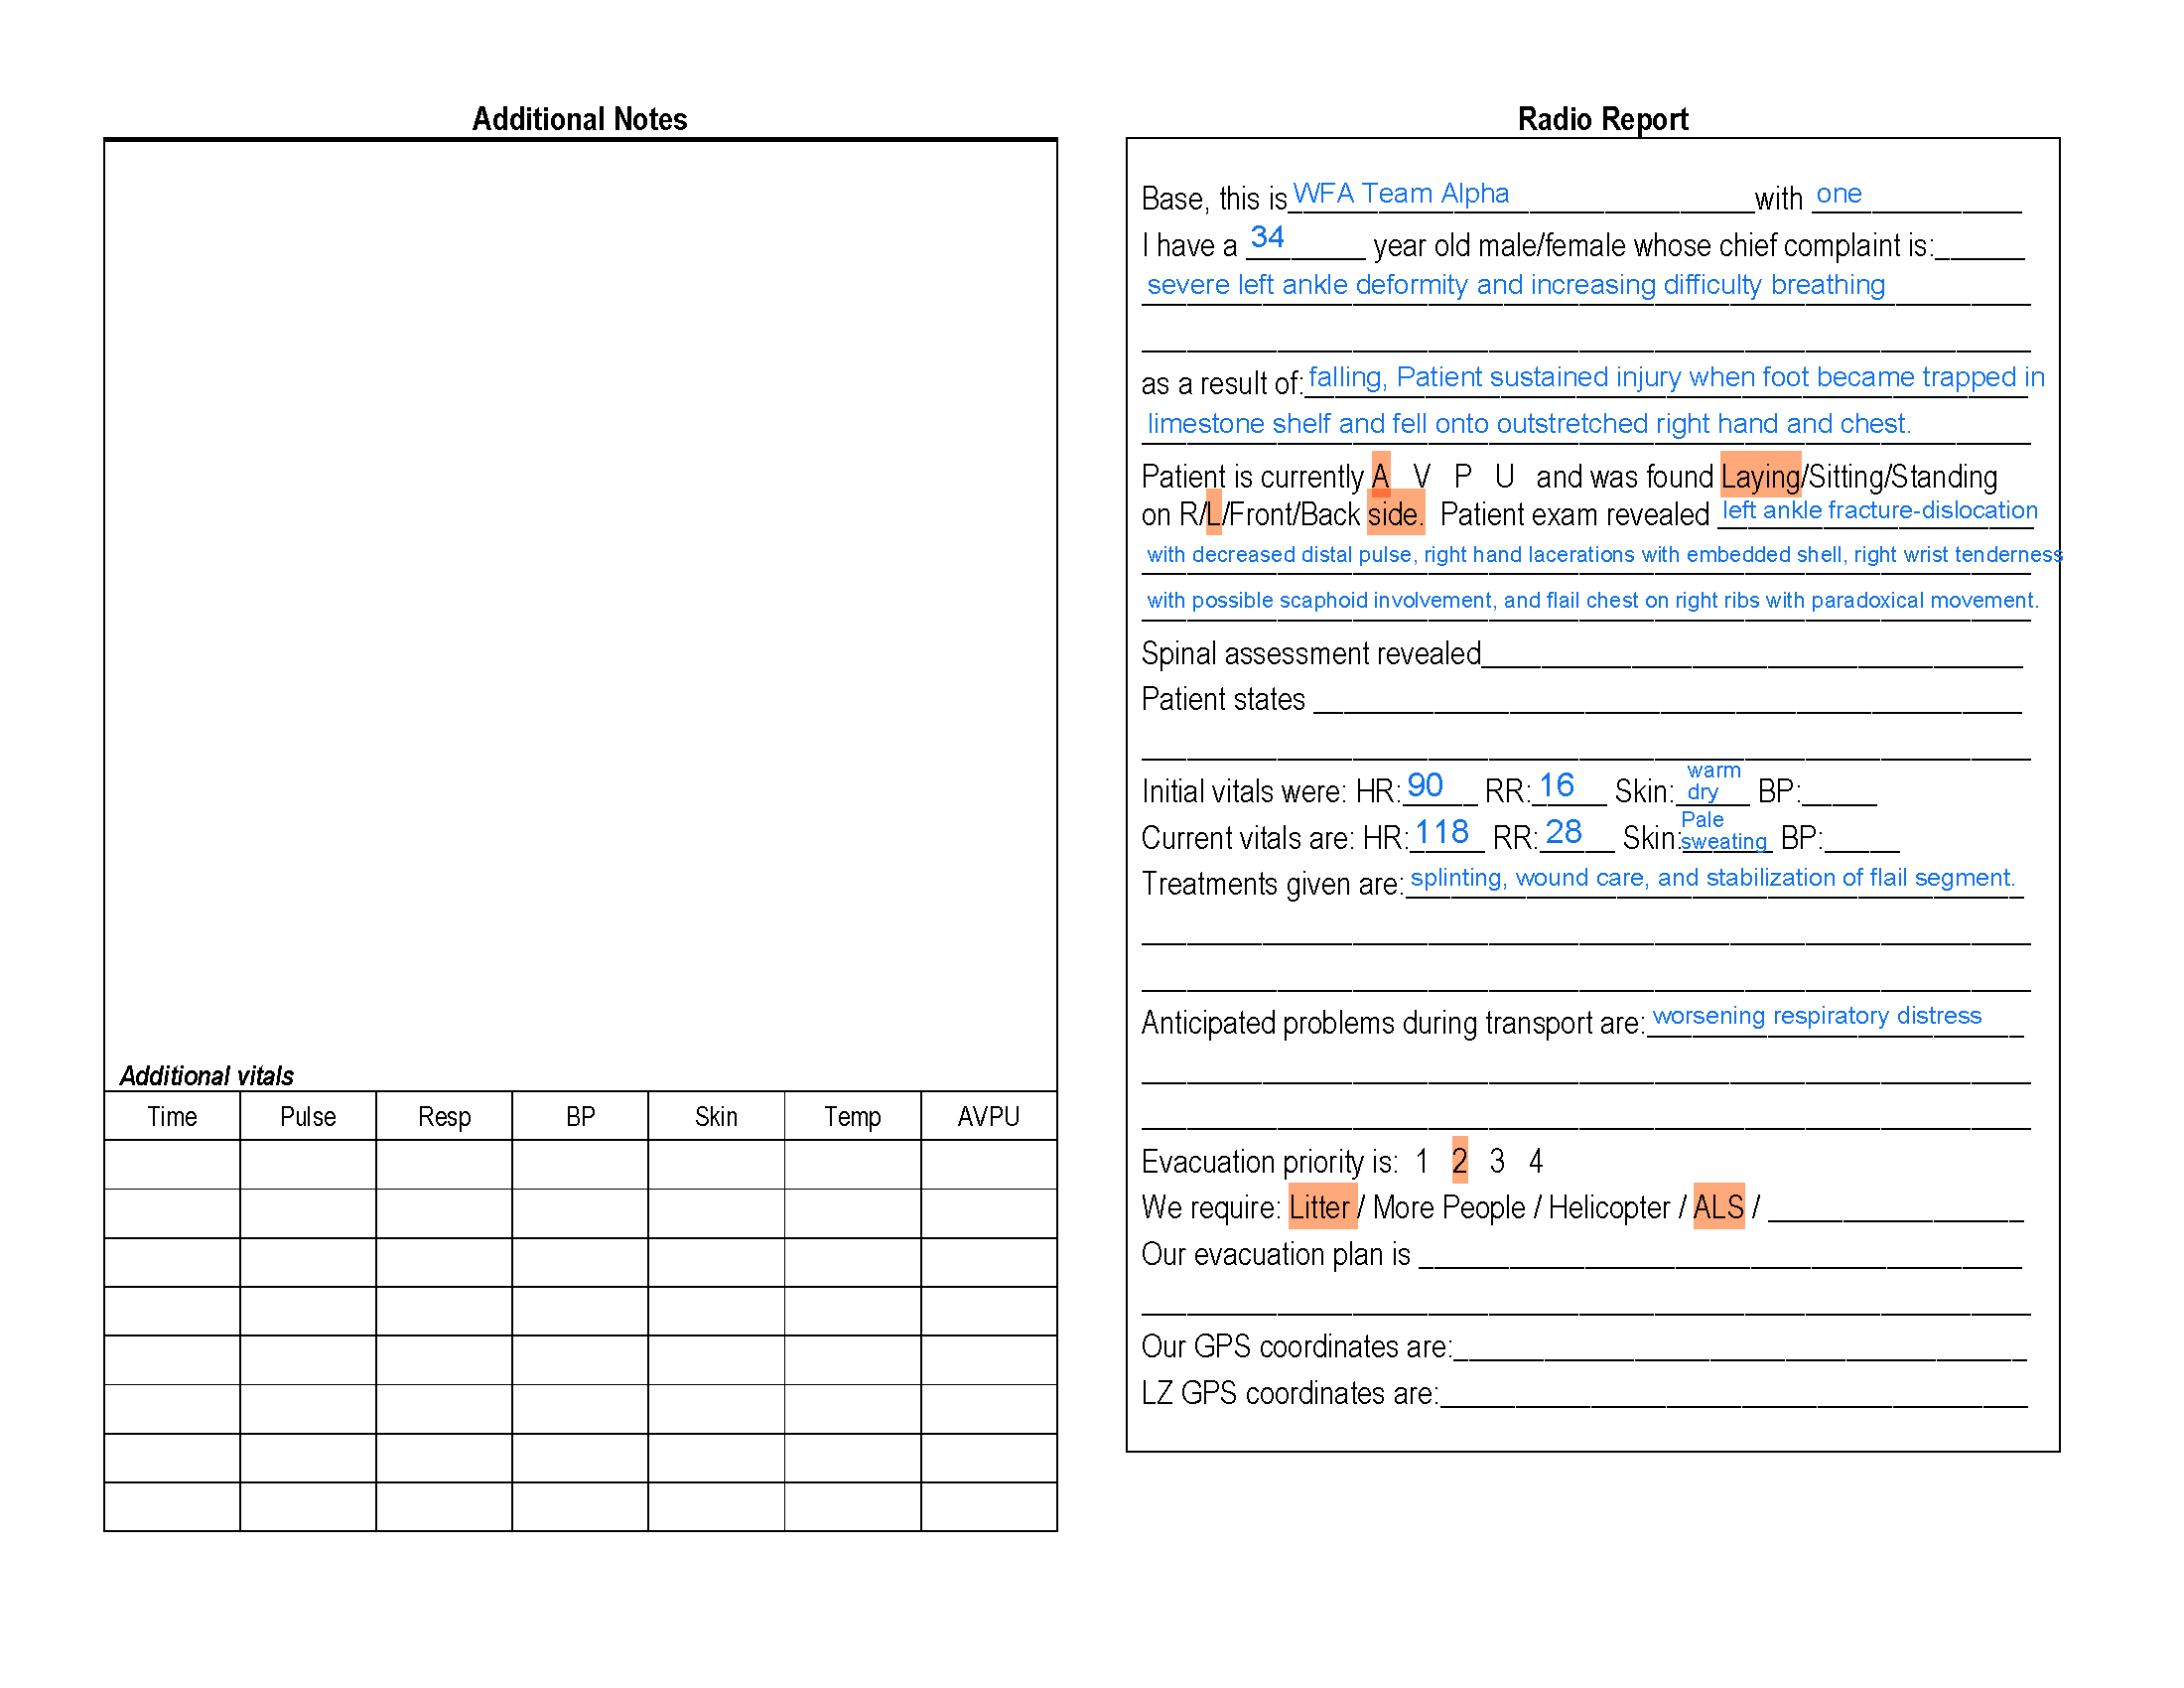
(Instruct your student helper or instructor to report vital signs when requested:)
T+0 initial: Pulse 90, Respirations 16, Skin warm pink dry, GCS 15
T+8 to T+10: Pulse 114, Respirations 24 shallow, Skin pale and diaphoretic, GCS 15 but anxious
(When students notice the trend — do not explain it for them. Let the numbers do the work.)
📋 ACT 7 — THE REVEAL
Your energy: shifting — ankle and hand still hurt but something else is wrong and you know it
[Student pivots to reassess chest — or you finally prompt them]
YOU: (with genuine concern now) “The ankle still hurts but this breathing thing is getting worse, not better. Is that normal? Should you look at my side?”
[Student removes PFD — unclip, slide off carefully]
(As PFD comes off — right shoulder bruising now visible for the first time)
[Student notes right shoulder bruising — newly visible]
YOU: “I didn’t know that was there. Does it look bad?”
(Pause your chest acting for five seconds. Let them look at the shoulder. Then:)
YOU: “But the breathing — that’s what’s worrying me now.”
[Student takes trauma shears, cuts shirt from hem upward]
(Hold still. Let the class look at what is revealed. Three full seconds of silence.)
What they see:
- Bruising right lower chest, ribs 5–8, lateral wall — subtle but present
- RIGHT lower chest wall moving INWARD on inhalation, OUTWARD on exhalation — paradoxical movement
- You have shifted instinctively toward injured-side-down positioning
[Student palpates right chest wall]
YOU: (sharp breath) “Right there — multiple spots. It’s not just one.”
(Take a breath during palpation — exaggerate the paradoxical movement)
YOU: “Does my chest look right to you? Part of it is moving the wrong way. I can feel it from the inside.”
[Student takes repeat vital signs]
Report: Pulse 118 increasing, Respirations 28 shallow labored, Skin pale diaphoretic, Anxiety visibly elevated
YOU: (genuine concern) “My breathing is harder. Every minute it gets a little harder. Why is it getting harder?”
[Student places stabilizing dressing on flail segment]
YOU: (slight relief) “Oh. That pressure — that actually helps.”
(Take a marginally less labored breath)
YOU: (quietly, looking at all the students around you) “I had no idea about the chest. I was so focused on the ankle and the hand I didn’t even… I didn’t notice.”
(Let that land.)
📋 ACT 8 — COME OUT OF CHARACTER
(Sit up. Hold up one hand.)
“Okay — pause. I’m back. Leave the moulage. Leave the dressings. Let’s talk about what just happened.”
🗣️ DEBRIEF SCRIPT & TEACHING POINTS
Point 1 — Count the injuries
“How many separate injuries did this patient have? Let’s list them.”
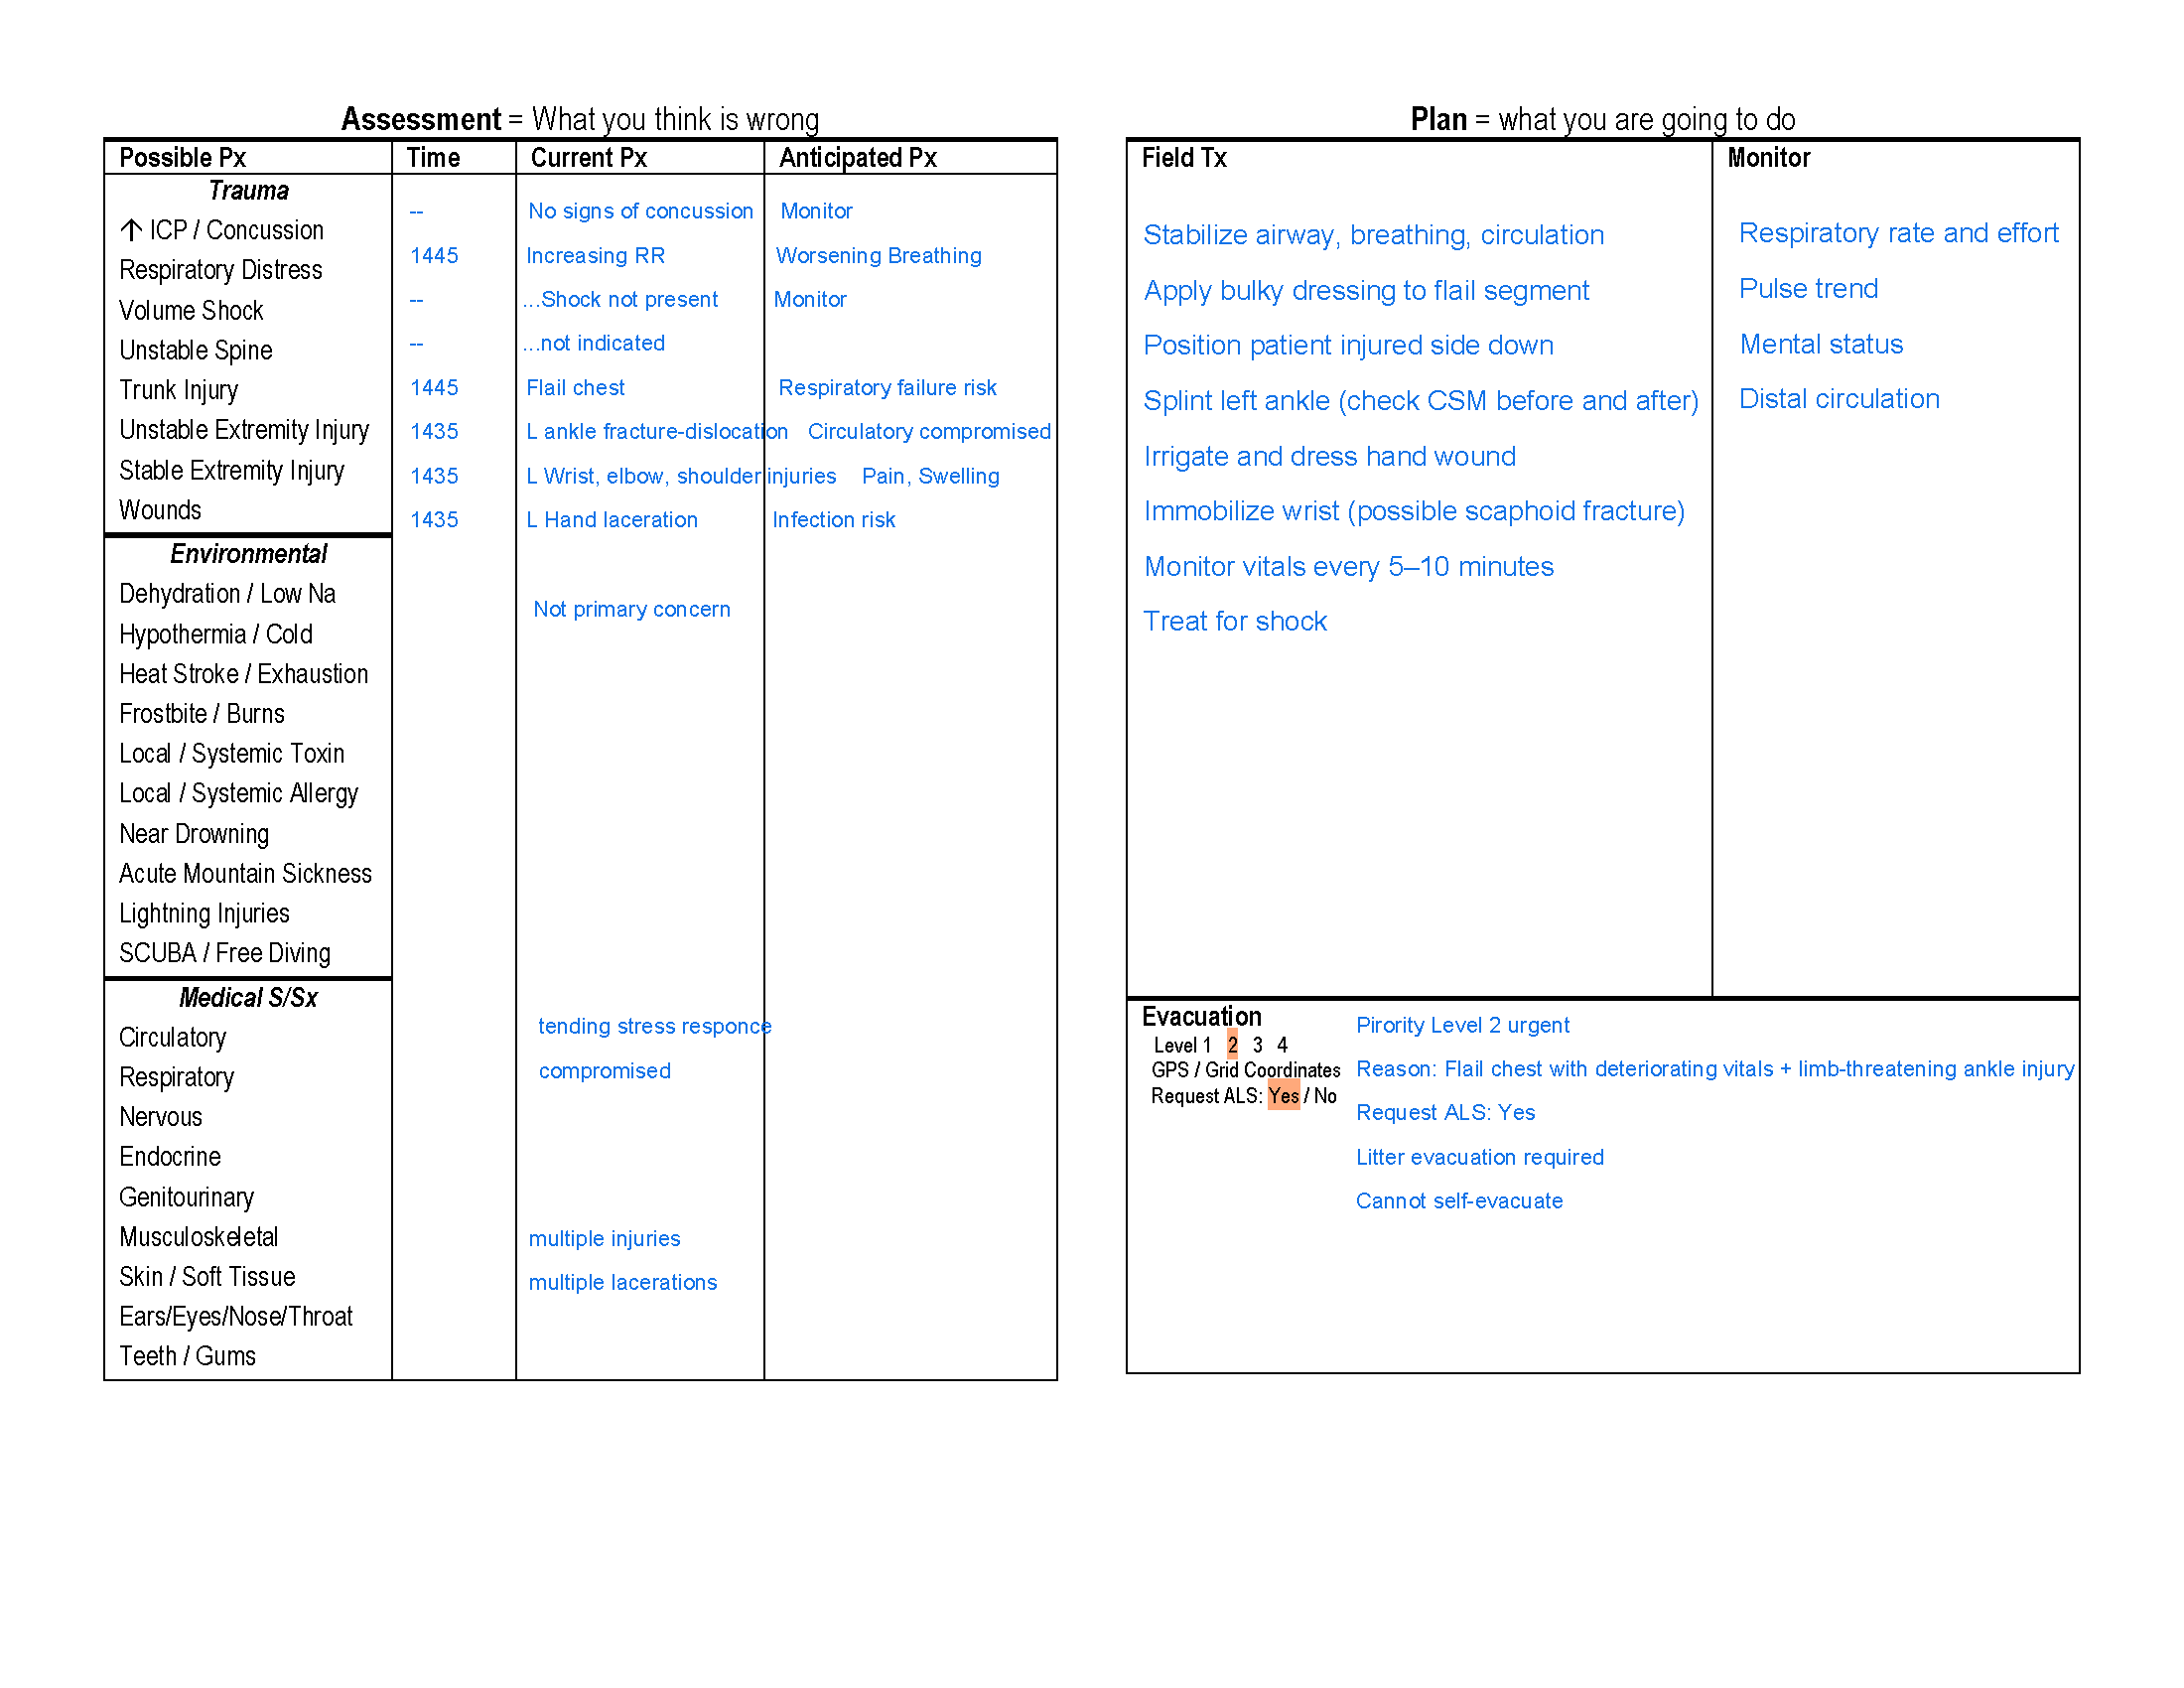
Walk through together: Left ankle fracture-dislocation with neurovascular compromise — Ottawa positive x3, diminished dorsalis pedis, altered sensation. Right palm laceration with embedded shell fragments — irrigation, fragment removal, bleeding control. Right wrist sprain versus fracture — distal radius tenderness, anatomical snuffbox tenderness (scaphoid concern), limited range of motion. Right elbow contusion — lateral epicondyle and radial head tenderness, limited flexion. Right shoulder injury — bruising hidden under PFD strap, limited abduction, found only on systematic exam. Right lower chest flail chest — paradoxical movement ribs 5–8, found last, most dangerous.
Teaching point: Six injuries. One patient. One mechanism. The dramatic ones almost buried the lethal one.
Point 2 — The outstretched hand mechanism
“When someone falls and throws their hand out to catch themselves, what do you expect to find up the arm?”
Teaching point: FOOSH — Fall On OutStretched Hand — is a predictable injury pattern. Force travels from palm to wrist to elbow to shoulder in a kinetic chain. Finding wrist tenderness should prompt you to examine the elbow. Finding elbow tenderness should prompt the shoulder. The anatomical snuffbox — the depression at the base of the thumb — is the specific palpation point for scaphoid fracture, one of the most commonly missed fractures in emergency medicine. Tenderness there is Ottawa-equivalent: evacuate for imaging.
Point 3 — The shoulder was hidden
“The right shoulder had bruising. Nobody saw it until the PFD came off. What does that tell you?”
Teaching point: Exposure is not optional. The PFD was the right clinical decision to leave on initially — it was providing support and the patient was stable. But a complete head-to-toe exam requires removing or moving every piece of equipment covering a body region. The shoulder injury was present from the beginning. The PFD hid it. This is why exposure is a step in the primary survey — not an afterthought.
Point 4 — Three distractors, one killer
“You had an ankle dislocation, a bloody hand with shells, a wrist injury, an elbow, and a shoulder. In what order did those injuries demand your attention — and what almost never got assessed?”
Teaching point: The distraction injury architecture is deliberate and real. Patients present their loudest injuries first. Rescuers follow patient attention. A systematic head-to-toe — performed every time, on every patient, regardless of what the patient is pointing at — is the only protection against missing the quiet lethal injury. The flail chest said nothing for eight minutes. The numbers told the truth.
Point 5 — Paradoxical movement
“Once the shirt came off what were you looking for — and how do you find it?”
Teaching point: Expose the chest and watch it move through several complete breath cycles. Paradoxical movement is subtle at first and becomes more pronounced as the patient tires. The flail segment moves inward on inhalation — when the rest of the chest expands outward — because negative intrathoracic pressure pulls the disconnected segment in. It moves outward on exhalation. You cannot see this through a shirt. You cannot feel it reliably through a PFD. The chest must be bare and you must watch it breathe.
Point 6 — Vital sign trend
“Pulse went from 90 to 118. Respirations went from 16 to 28. What does that trend mean?”
Teaching point: A single vital sign reading is a snapshot. A trend is a diagnosis. Neither 90 nor 118 alone tells you much. Watching 90 become 114 become 118 while respirations climb from 16 to 24 to 28 tells you a patient is working harder to compensate for something. In this case: a flail segment causing progressive hypoventilation and a pulmonary contusion developing beneath it. The numbers found the chest injury before the hands did.
Point 7 — The embedded shells
“The right hand had shell fragments embedded in it. Walk me through your field management.”
Teaching point: Irrigate, do not dig. Copious irrigation with clean water removes surface contamination and loosens superficial fragments. Fragments that do not flush out easily are not removed in the field — probing a contaminated wound with field instruments worsens contamination and risks damaging underlying structures. Dress, cover, evacuate. The shells will come out in a sterile environment. A bloody hand is dramatic. It is not life-threatening. Manage it after the airway, breathing, and circulation are confirmed.
Point 8 — Evacuation priority with six injuries
“Six injuries. Rank them by evacuation urgency.”
Teaching point: Flail chest — serious evacuation, respiratory deterioration, cannot paddle, needs imaging and monitoring. Ankle fracture-dislocation with neurovascular compromise — urgent, diminished dorsalis pedis, limb threat. Wrist with scaphoid concern — evacuate for imaging, not immediately limb-threatening. Elbow and shoulder — evacuate for imaging, not immediately limb-threatening. Hand laceration with shells — clean, dress, evacuate with the rest.
The flail chest drives the category. Everything else goes along for the ride.
🎯 Close With This
“Five things from today:
One — FOOSH is a kinetic chain. Wrist tenderness means examine the elbow. Elbow tenderness means examine the shoulder. Work up the arm.
Two — the anatomical snuffbox is small, easy to miss, and clinically significant. Palpate it on every wrist injury.
Three — expose everything. The PFD hid a shoulder injury for the entire scenario.
Four — the chest is always the last place students look and the first place a patient can die. Expose it. Watch it breathe.
Five — the vital sign trend told the truth eight minutes before anyone looked at the chest. Check vitals more than once.”
📋 QUICK REFERENCE CARD
INJURY INVENTORY — MILE MARKER 9 V3:□ L ankle fracture-dislocation — Ottawa + x3 Diminished dorsalis pedis — urgent□ R palm laceration — embedded shells Irrigate, dress, do not dig□ R wrist — distal radius + scaphoid tenderness Anatomical snuffbox = evacuate for imaging□ R elbow — lateral epicondyle/radial head Limited flexion, contusion vs fracture□ R shoulder — hidden under PFD Found only on exposure and systematic exam□ R flail chest ribs 5-8 — FOUND LAST Paradoxical movement, deteriorating vitals NEVER circumferentially wrapFOOSH KINETIC CHAIN:Palm → Wrist → Elbow → ShoulderExamine each if the one below is tenderVITAL SIGN TREND RULE:T+0: Pulse 90 / Resp 16 / Skin WPDT+10: Pulse 114 / Resp 24 / Skin paleT+12: Pulse 118 / Resp 28 / DiaphoreticOne reading = snapshot. Trend = diagnosis.FLAIL CHEST — FIND IT:□ Shirt off — PFD off — chest bare□ Watch full breath cycles — count 4-5□ Paradoxical movement = flail segment□ Stabilize with bulky dressing□ Injured side DOWN□ NEVER circumferential wrap□ Serious evacuation
Six injuries, three distractors, one killer hiding under a PFD and a shirt, and vital signs that told the truth before anyone thought to look. Let me know if you want a moulage placement diagram showing all six injury sites, a timing script for symptom escalation, or a student assessment checklist scored by injury discovery order.
